
Looking to install your brand new water softener? You're in luck! Today I’m going to show you exactly what first steps you need to take to assemble and get your new water softener ready for installation.
BEFORE YOU BEGIN

So you’ve just invested in one of our HUM Water Softeners to make your home more efficient and easier to keep clean by softening your water, and want to know where to begin?
Whether you’ve chosen to install the water softener yourself or have a plumber install it for you, be sure to read this blog right to the end because I’ve included all of my tips and tricks to make the process as straightforward for you as possible.
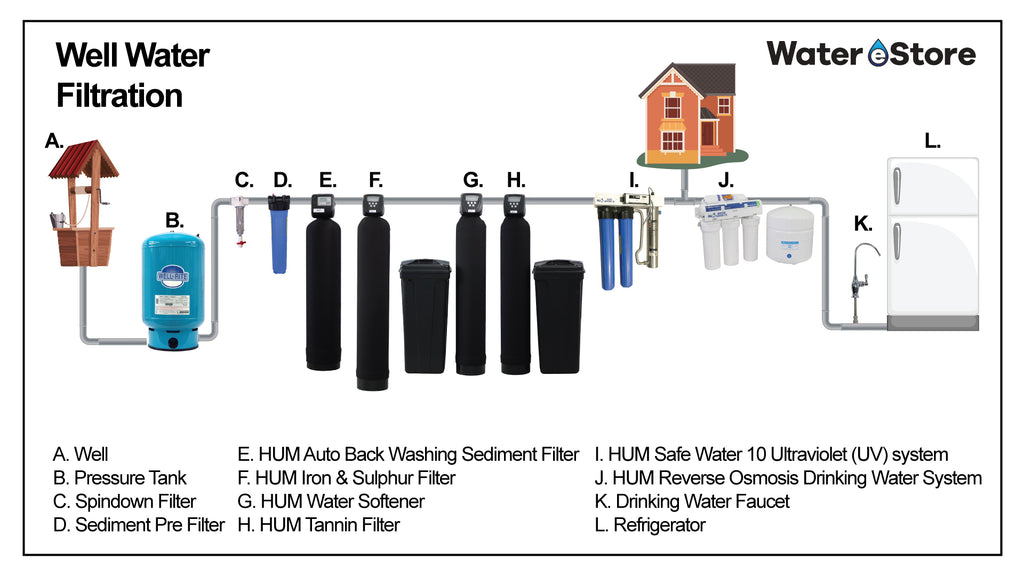
PRO TIP: If you have another water treatment system you're looking to install, the installation process is pretty much the same! Follow these steps if you’ve invested in a tannin, iron & sulphur, or backwashable filter and want to install with ease.
Step #1 – Check for Damage
As soon as your water filtration equipment arrives, check to see if there is any damage to the exterior. If there is, let the shipping company know before you sign for it.

Step #2 – Unboxing
Open up the box right away and check out the contents.
Step #3 – Check Contents
You’ll notice that our HUM stickers are not on the valve, that is because the company that makes the equipment for us ships it directly to you so we don’t have a chance to add the stickers. But let us know if you would us to mail them to you!
Inside the box you’ll find the bypass, the fully assembled media tank with the valve on top, brine tank with lid, brine well with float, 3/8” brine line and, by default, a ¾” sharkbite tailkit included to attach it to your plumbing.
Step #4 – Assembly
In this stage you will be installing the bypass, adding the tank jacket, and zipping it up at the back. The brine well must be assembled so that the overflow is locating the brine well in place, and the opening is orientated toward the hole that will feed the brine line to the valve on the media tank.

Step #5 - Adjustments
If the media tank doesn’t seem to stand up quite straight you can adjust it by picking it up and lightly banging the side you need to move it to, on the floor to adjust the base.
Step #6 – Plumbing Connections
Depending on the type of plumbing you have and where you’re going to connect to the drain, you’ll need some fittings and pipe with which to attach the tailkit and drain connection. We suggest ½” pex drain line for water softeners but ¾” for iron and back washable filters.
Step #7 – Location
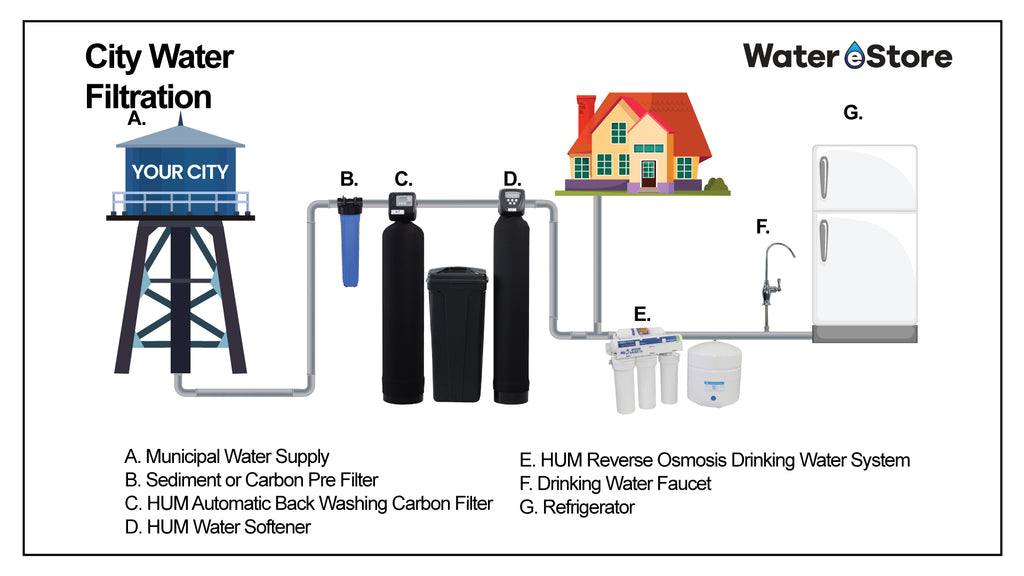
The equipment is installed after the main shut off from your water meter, if you’re on a municipal water supply, or after your pressure tank if you are on well water — but before the water splits into hot and cold.
Where you actually place the softener in your home should be somewhere that you have a clean, level hard surface. If not, you can always put down patio stones first.
Step #8 – Programming Settings
All of our water filtration equipment comes fully programmed, all you need to do is to set the current time and hardness. Modern water softeners are very efficient, but only when the hardness is set correctly.
For Steps #9 – #12, check out our Water Softener YouTube Video Installation playlist link below to complete your installation.

>> SHOP HUM WATER SOFTENERS


